Fitting a Bit Correctly
I’m often asked how to correctly position the bit in the horses mouth, and granted, it’s a relevant question as all mouths and bits are different.
I often hear from riders they have been told that two wrinkles at the corners of the lips shows a good fit, but is it true?
Let’s break this down a little, based around fitting snaffle bits.
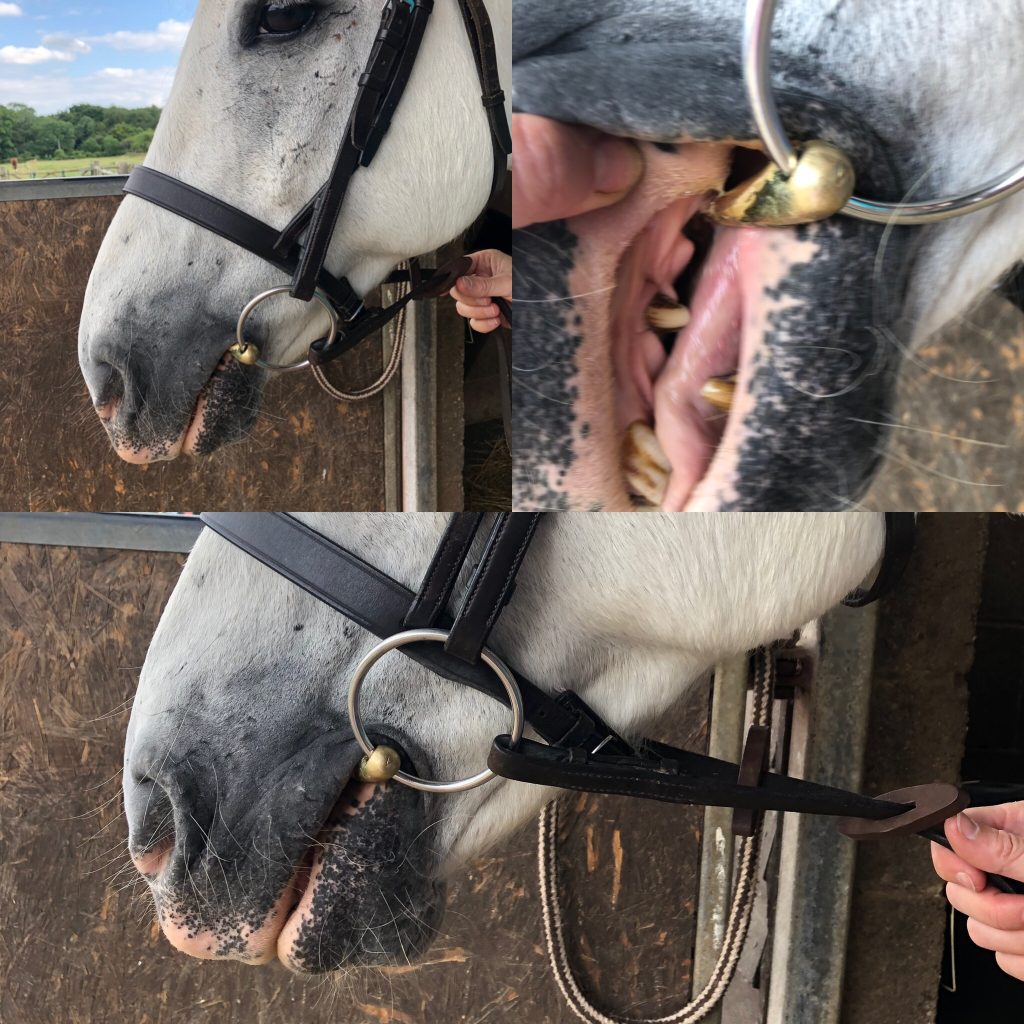
Bit Positioning
The wrinkle guide can be a good rule of thumb to ensure the bit isn’t sitting too low in the mouth. A bit sitting too low can be troublesome especially for male horses with their tushes (canine teeth) that are situated in the interdental space between the pre molars and the incisors (front teeth). If the mouthpiece sits too low it can interact with the tushes when the horse relaxes the mouth, and perhaps become hooked over the front of them, causing all sorts of problems. Also, a low bit will be very mobile in the mouth without rein support, so when the contact is slackened or dropped, the bit will fall in the mouth, which can encourage a busier mouth, as the horse will always be moving the bit around trying to stabilise it.
Lip Wrinkle Rule
If the bit is positioned too high to achieve the two wrinkle rule it will appear from the side that the horses lips are stretched, (think looking like the Joker), you may also see a parting of the lips at the front of the mouth and the incisors (front teeth) may become exposed. Run your fingers around the lips, they should feel soft and pliable, not taut and stretched. A bit positioned too high may also give constant pressure on the pre molars, which can damage the teeth and feel quite uncomfortable for the horse.
Fleshy or Thin Lips
You must also consider if your horse has large fleshy lips or small thin lips. Sometimes fleshier lips are more vulnerable to rubs if the bit is too high and the lip wrinkles are quite deep. Sweat, dirt and saliva can accumulate in the creases and irritate the skin with a constant rubbing movement and create sores. Thinner lips can also be problematic, especially if the lips are pulled too tight and stretched to achieve the two wrinkles. This can make them susceptible to splits and sores on the corners of the lips.
Bridle Cheek Pieces
A better guide is to check how the cheek pieces support the bit. Always ensure the cheek piece buckles are on the same holes so the bit sits level in the mouth. The cheek pieces should support the bit with a slight feeling of tension and not go completely slack when the contact is taken up. You can easily check this from the ground by imitating your contact with the rein so you can see what happens to the bit and cheek pieces – if they go saggy, the bit is too low, if they feel very taut, the bit is too high.
Hanging Cheek/Baucher Bit
However, an exception to the rule is the hanging cheek. It is designed to eliminate poll pressure when the contact is taken up, so the cheek pieces may bow a little as the rider picks up the rein and contact, basically the rider stabilises the bit in the mouth, rather than the bridle.
Correct Bit Position
Correct bit fitting is never as simple as counting wrinkles (I wish it was). Every horse has a unique mouth shape, lip thickness and way of going, which means the bit must be adjusted with care. Taking the time to assess cheekpiece tension, the type of bit used, and the horse’s individual anatomy can help to prevent rubs, sores and unnecessary resistance. A well-fitted bit allows clearer communication, greater comfort, and ultimately a more harmonious partnership between horse and rider.
If you are unsure, book a bit fitting appointment to have your bit correctly fitted. We cover the South East for in person appointments, and offer remote consultations worldwide.
#bitfitter #correctbitfitting #howtofitabit #mobilebitfitter #bitfitterkent